Whitbeck Notes
Fall 2025
Better late than never! It has taken me some time to get to writing and sending out these Fall Whitbeck Notes. The main reason being that I had wanted to have some new paintings to show, and that had taken some time. I now have a few varnished and ready and I look forward to putting them out there for the first time. Plus, it has been busy in the studio with most of my attention going to painting; starting new ones, coming up with new ideas, finishing pieces, varnishing, preparing panel, commissions, etc. And sometimes I feel I just need to paint, paint, paint. March will be here before you know it, and the paintings wont paint themselves!
But today I decided to just sit down at my studio table, pen in hand, paper before me and just get to it. It is always an enjoyable task for me, writing the Notes. It is just that sometimes it takes a bit to get going. An experience, I am sure, all of you have had at one time or another.
One of the questions that I hear most during the course of an art show is "how do you do that?" Meaning, how do you paint these? How do you get that smooth surface? Not seeing any texture, visitors to my booth, at a distance are thinking prints or photographs. They are more used to the oil paintings accomplished with larger brushes, a looser technique, more of a visible texture and brush stroke. But having the fondness for 16th and 17th century painters that I do, I follow in their footsteps as far as technique goes. A pretty smooth, layered approach. And as I have written in detail in previous Notes about this (Summer 2019 and Fall 2022) I think that I will angle off differently this time and share with you some of the "tricks" that I use for getting the image of the still life set-up before me, sitting at my easel, to an image on my panel. The transfer process from three dimensional to two dimensional.
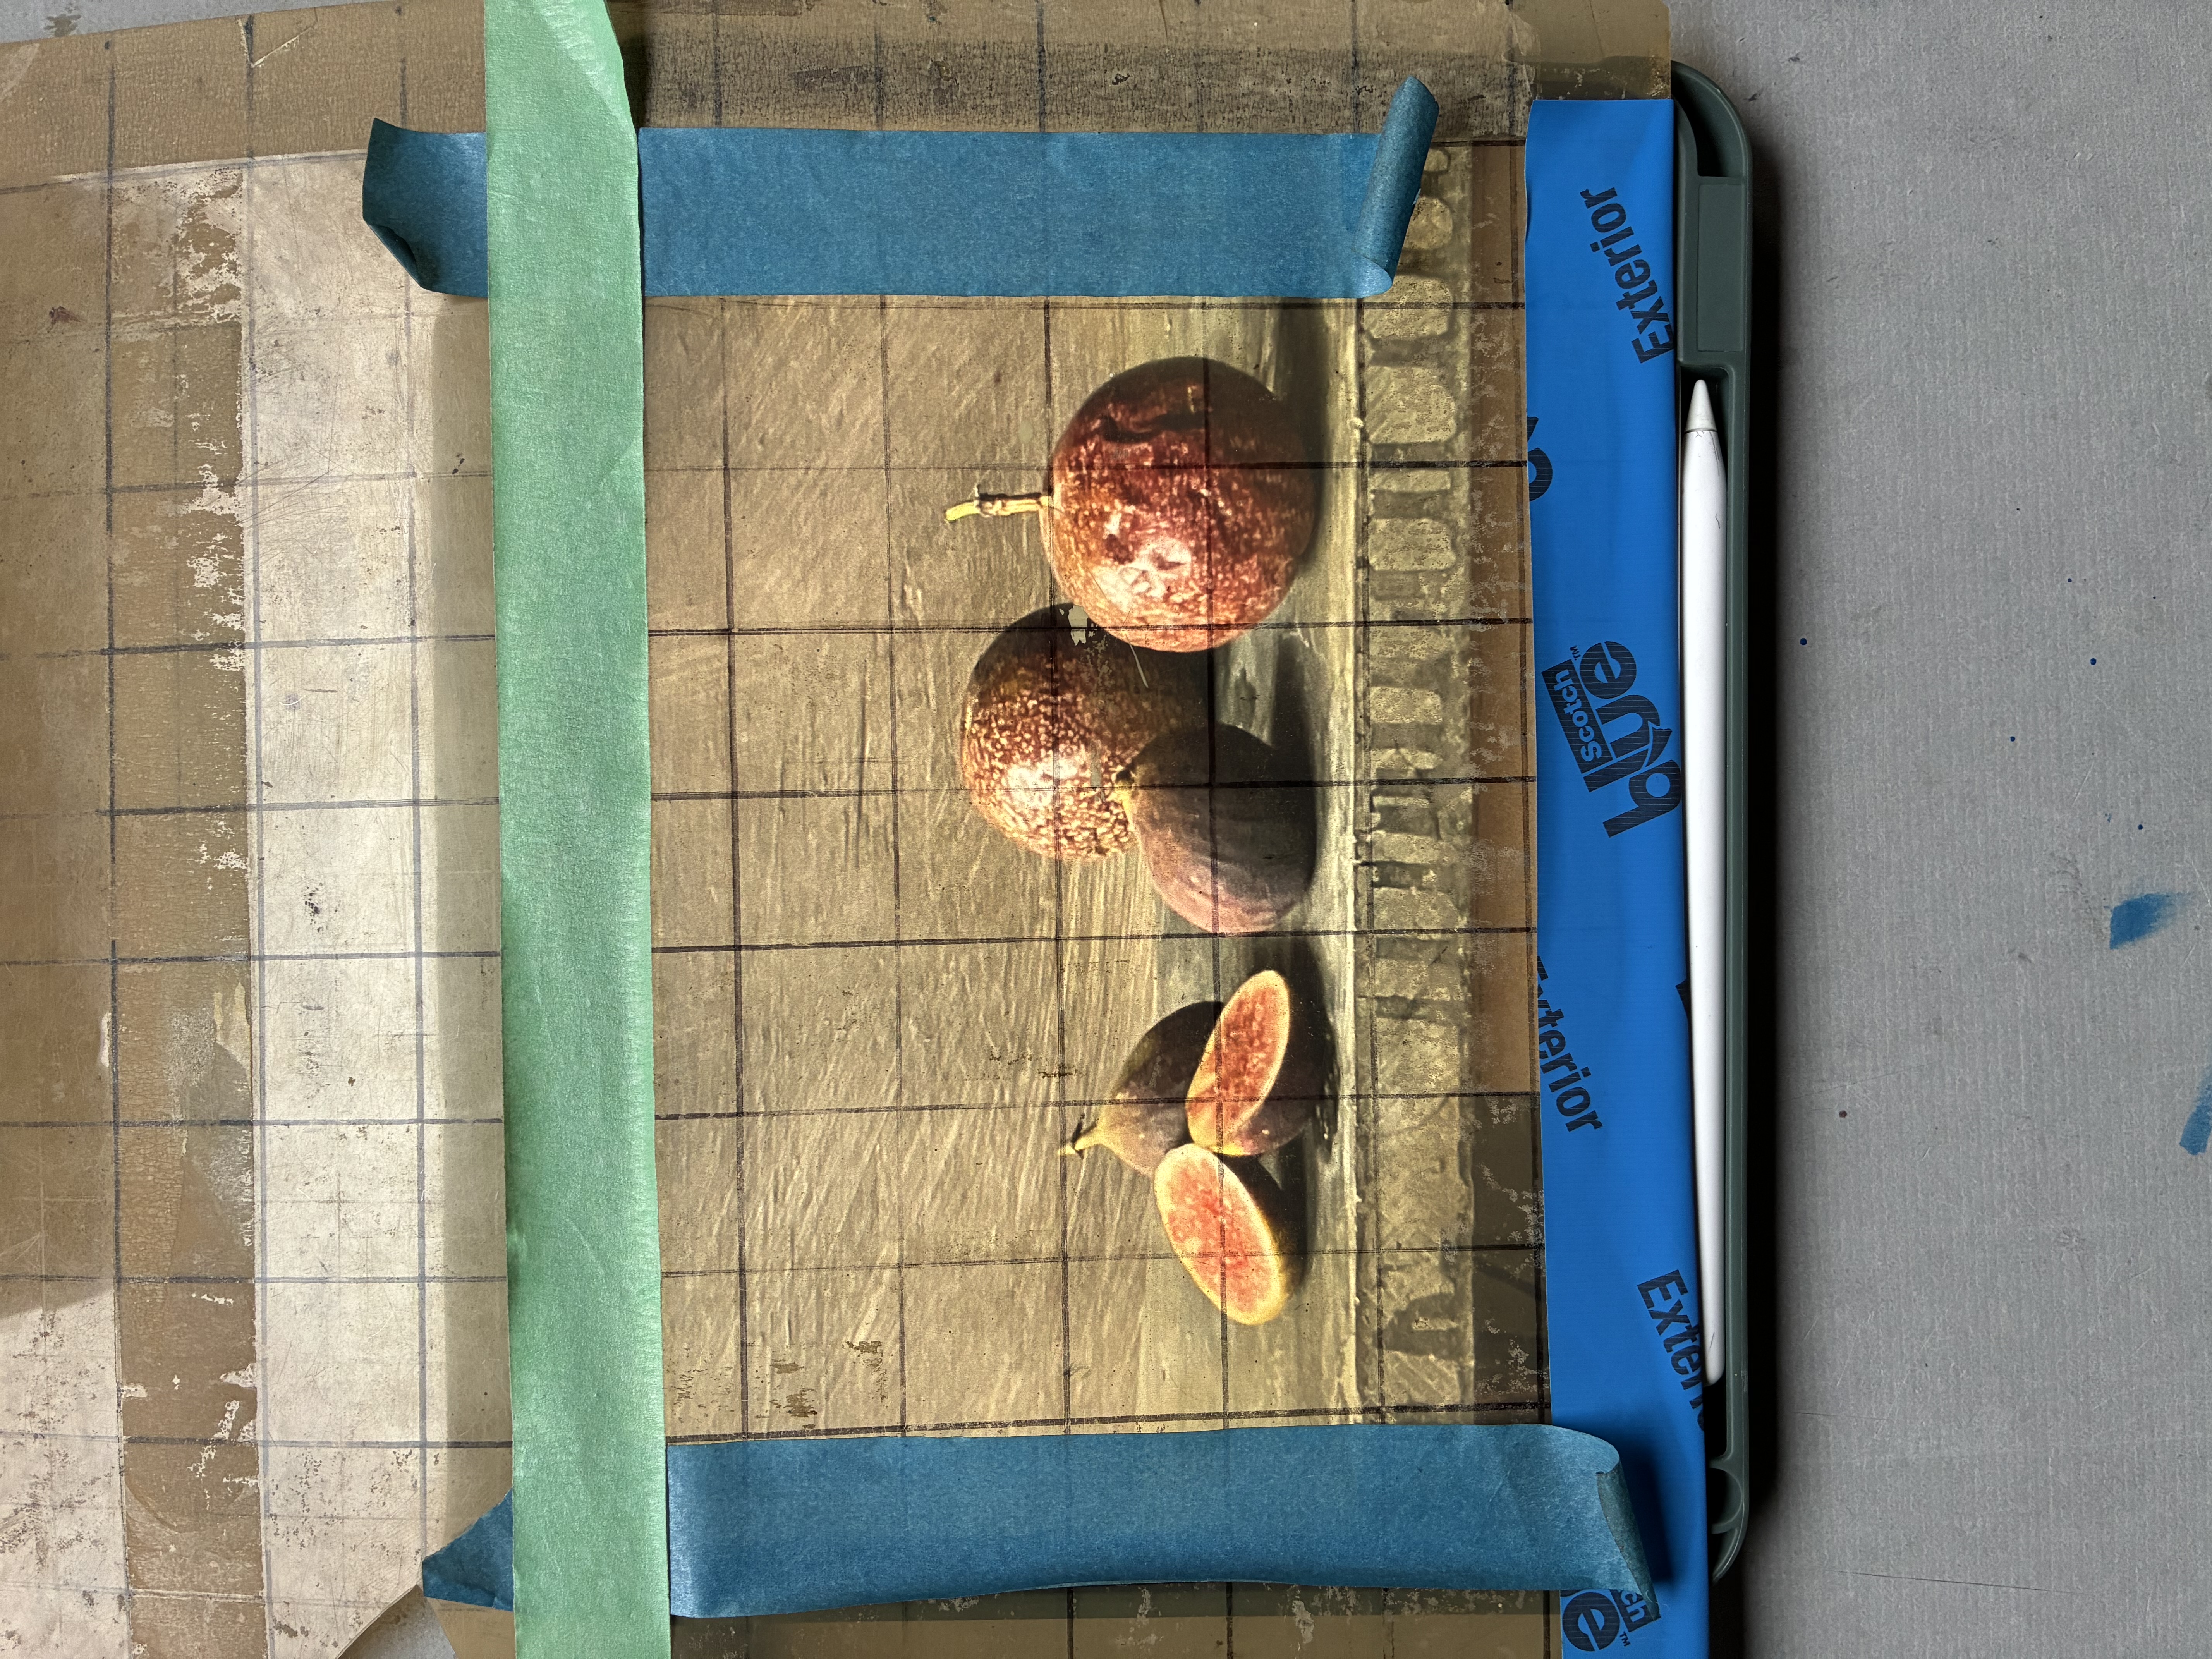
Artists now-a-days have many different ways of getting image to canvas or panel, and with some it really depends on their manner of painting, what they are painting, size of painting and so forth. But for me, after 27 years or so of being a professional artist, I have found that the "Grid System" is perfect and allows me to get the basic lines of my set-up on the panel where I can then "work out" the painting with my brushes. Simply put, this system has a grid put up in front of your set-up and a similarly numbered grid marked out on your panel, where you can then transfer, square by square, the image from one to the other.
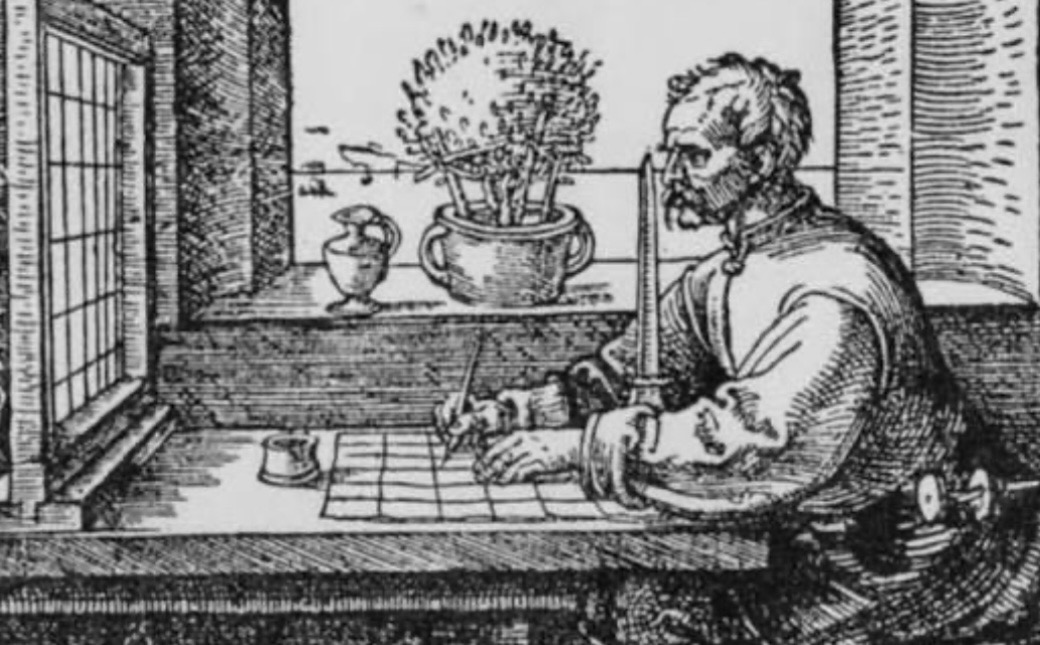
This is no new trick and has been used for many centuries. I have no idea of its first recorded use, but it was well popular with artists in the 15 and 16 hundreds. There are a number of paintings and engravings showing artists in studio with this grid in action; the artist sits at the easel with the subject opposite (figure, still life or landscape), and an open wood frame, gridded with string positioned between them. With the painter keeping their same position, so as to not visually shift the grid before them, they are then carefully able to work, one square at a time, reproducing the live image onto their canvas. It is so simple and so genius! And this is the technique that I use, albeit in a 21st century way.
I have the benefit of an I-Pad in my studio and so have not had to build and keep a large wood frame. The grid I do have is a 12" by 12" clear sheet of heavy gauge plastic that has a permanently marked 1" by 1" square grid on it. And with my I-pad and plastic sheet I now have the modern version of the Renaissance grid system.
Once I have my still life set up and ready, I am then able to position the I-Pad in front of me and with it, take a photo of the set up as I would see it from behind my easel. Then, laying the I-Pad down on my work table, I place the gridded plastic sheet over the photo. I then grid the panel that I will be painting on with a duplicate grid as that on the plastic sheet, the same number of squares, just differing in size depending on the panel.
Next comes the task of transferring, square by square, all that I see in the squares of the I-Pad to the squares of my panel. The only flaw to this way of doing it is that the camera can distort objects, especially those on the outer edges of the image. So after I get the basic lines down, I can then take the panel to my easel with the actual still life in front of me and correct wherever it is needed.
This technique shows its usefulness when there are really complicated objects in the still life. The big one that comes right to mind is our beautiful Kashan carpet with its fantastically woven patterns and tiny floral motifs. I have painted this Kashan numerous times, as some will have seen it in previous paintings. And each time, even though tedious, I was very happy to have the grid helping me sort out the tangle of lines and curves of that carpet.
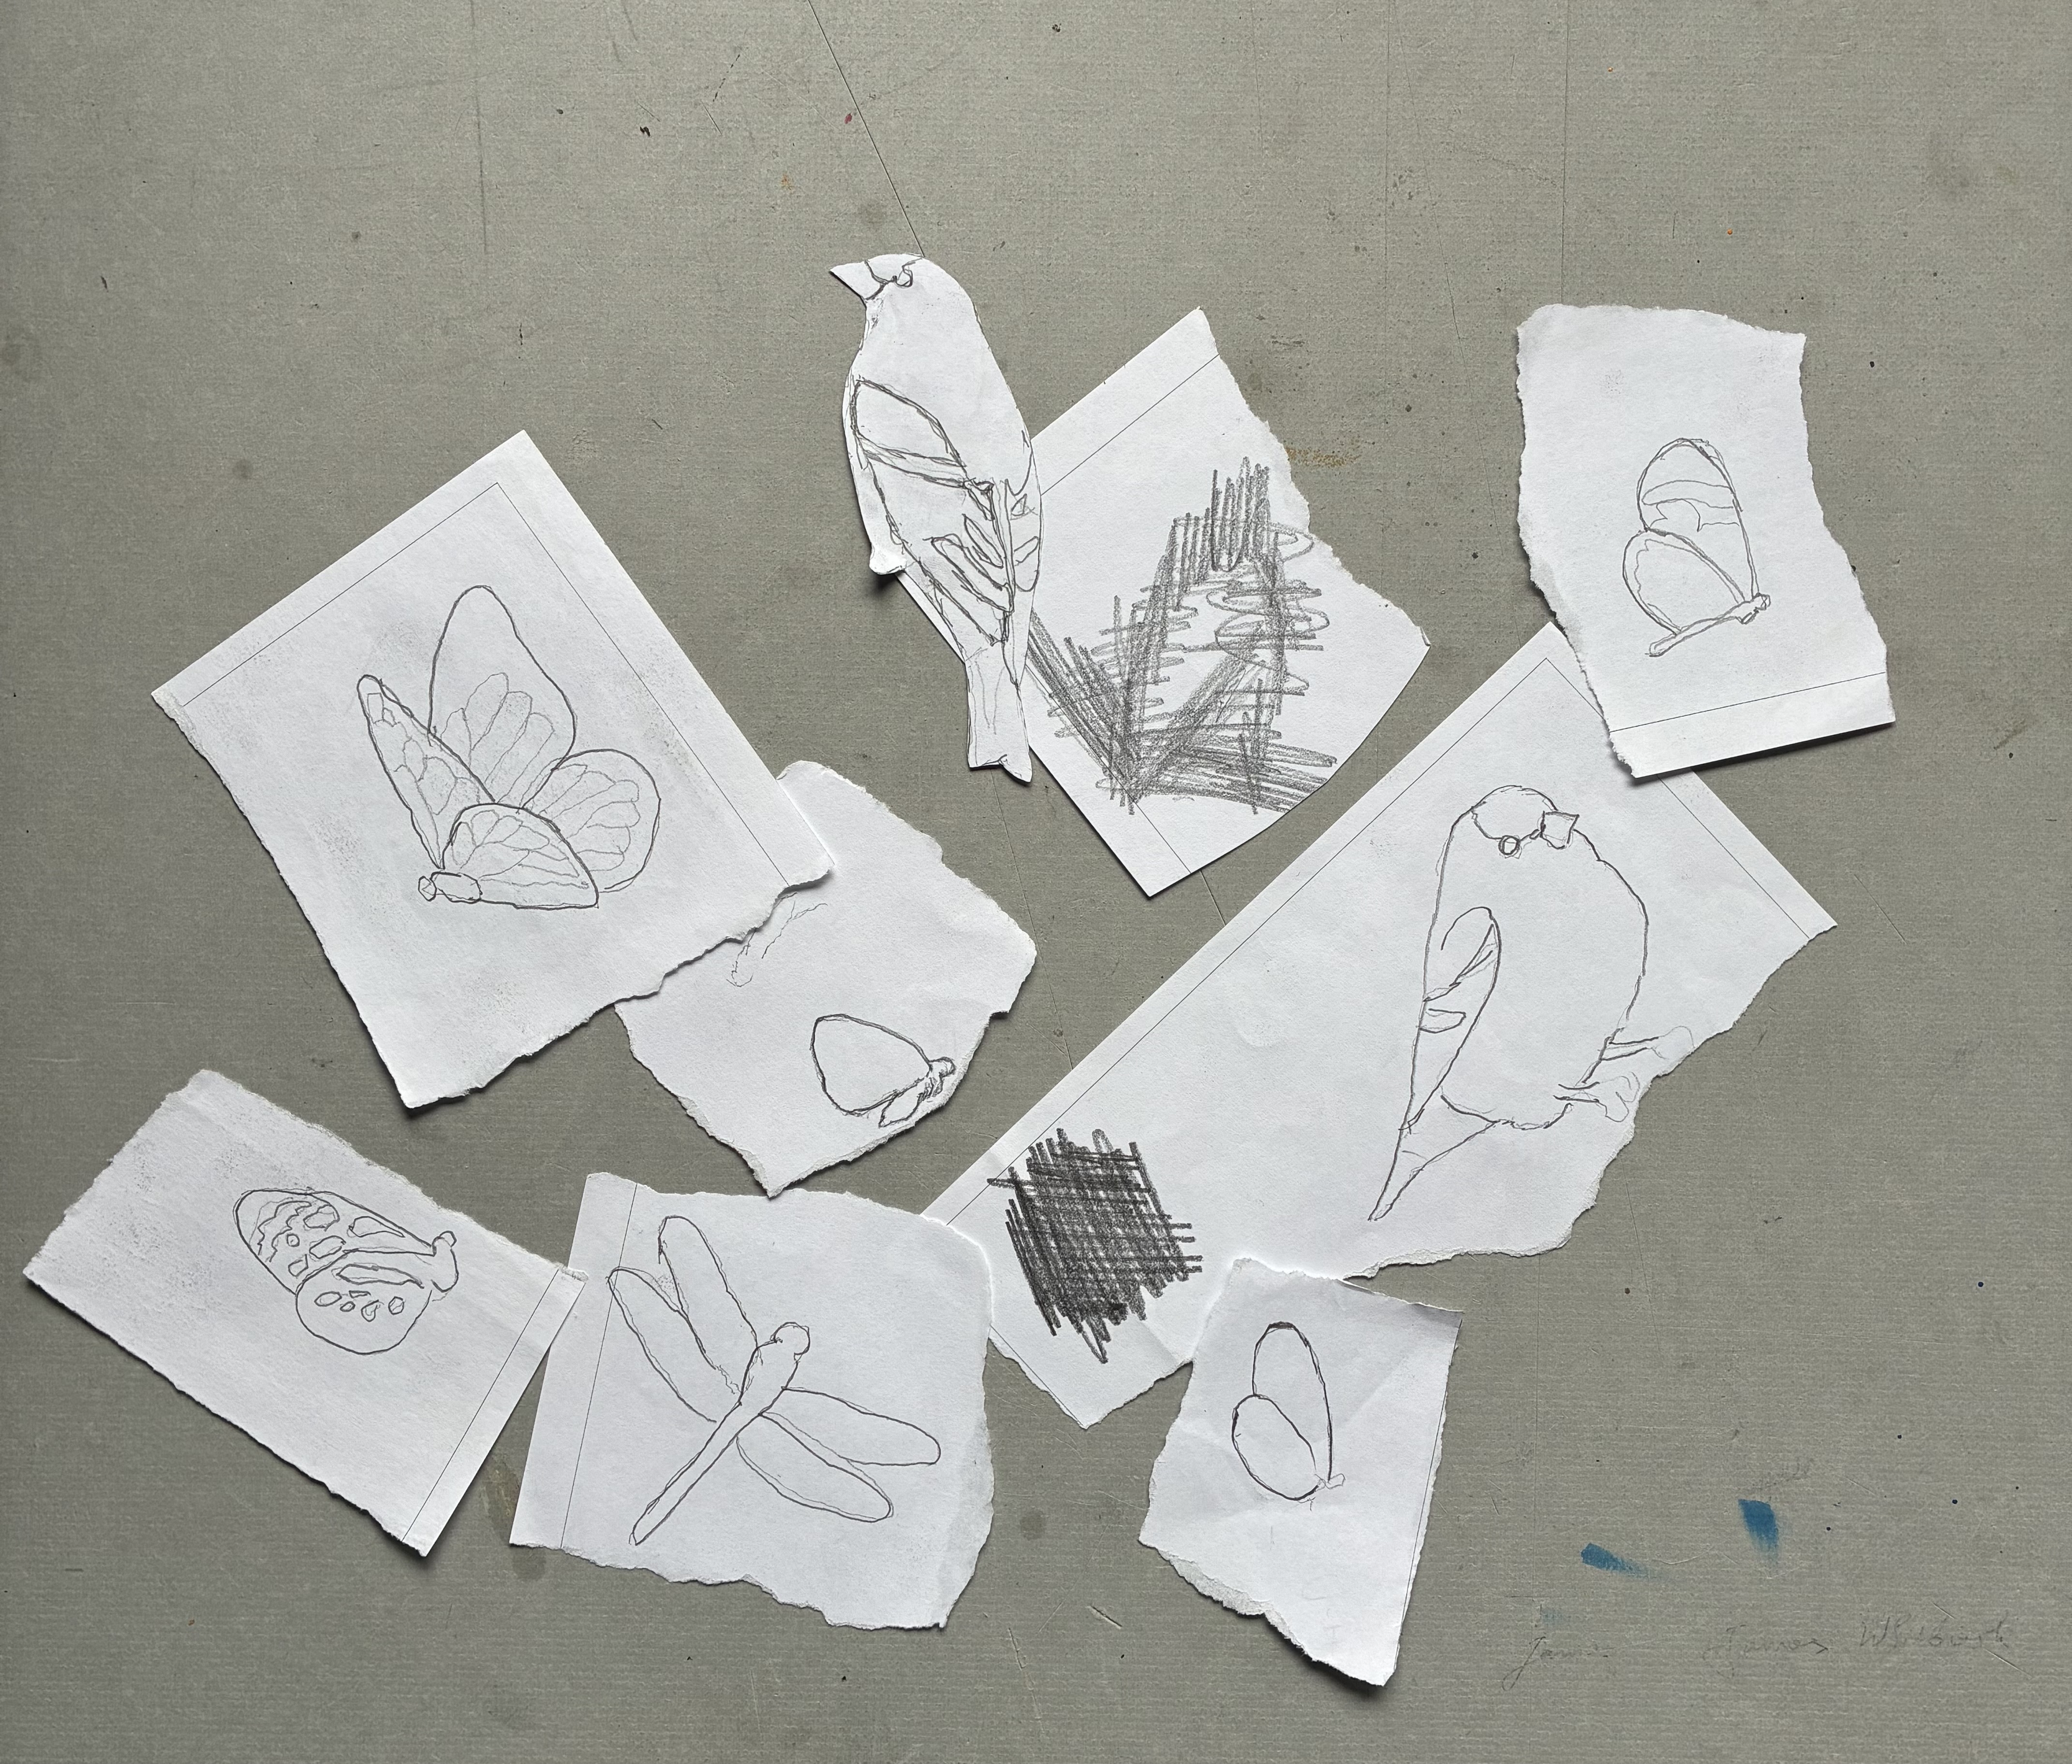
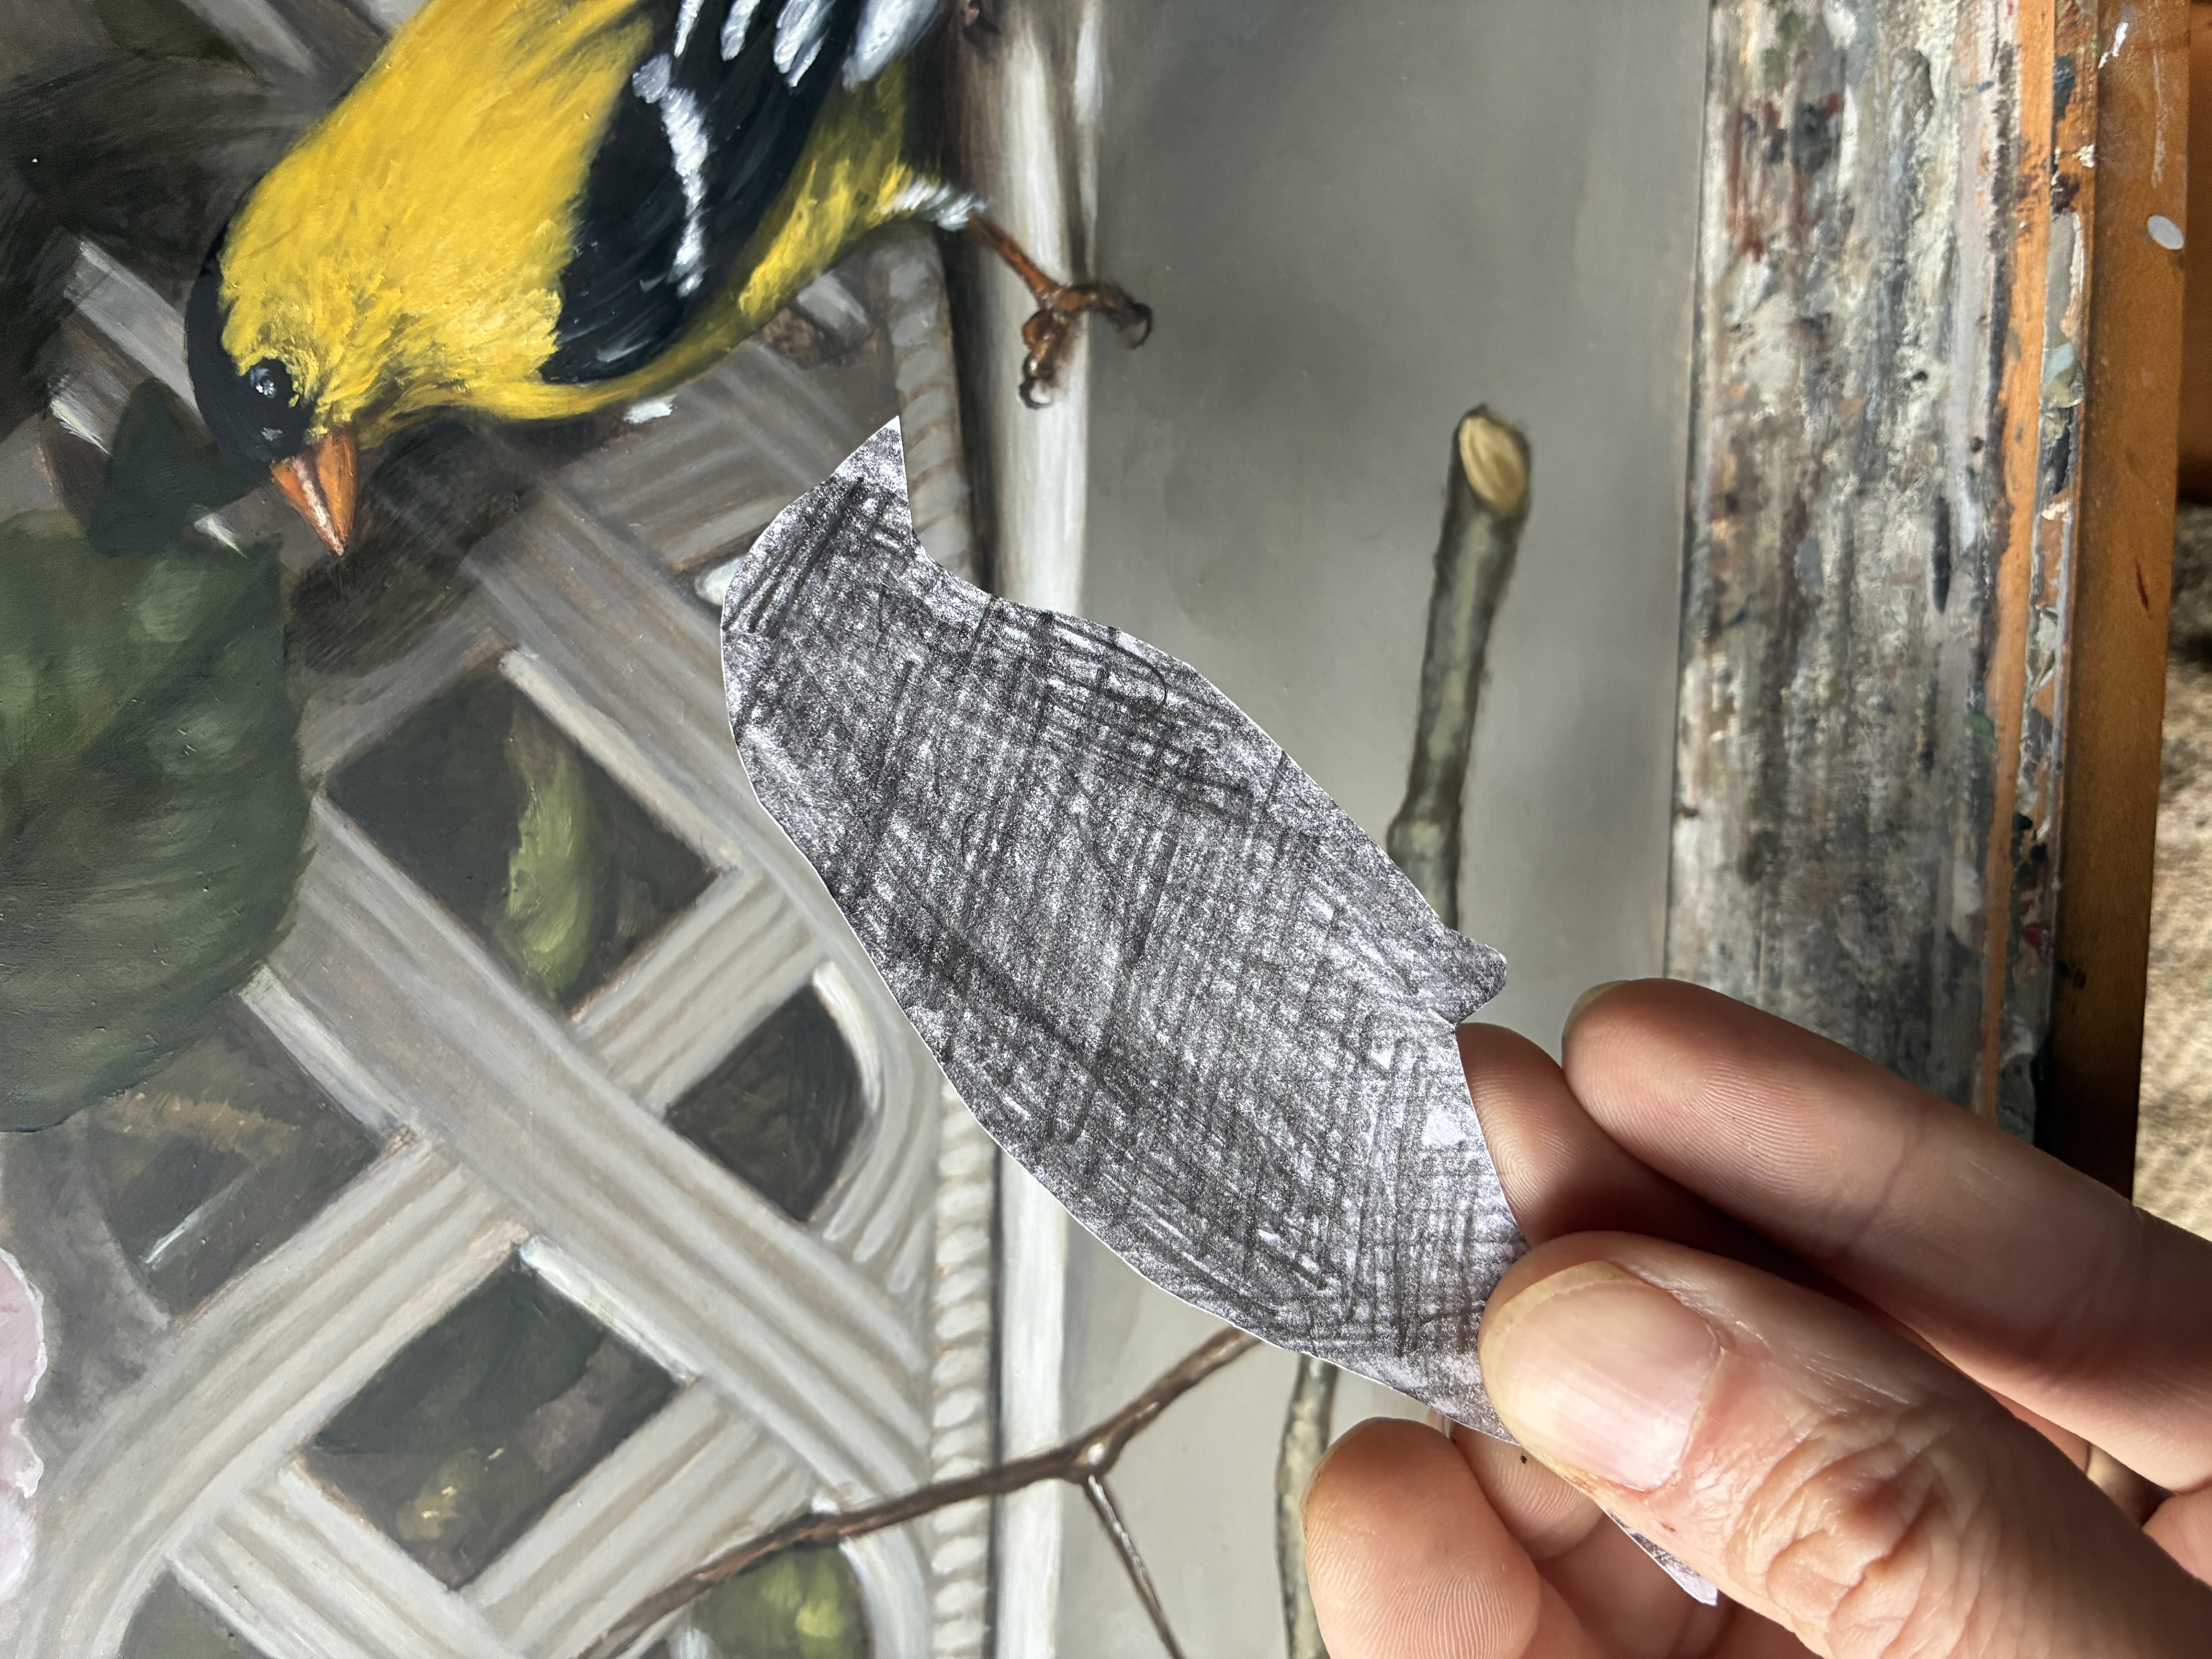
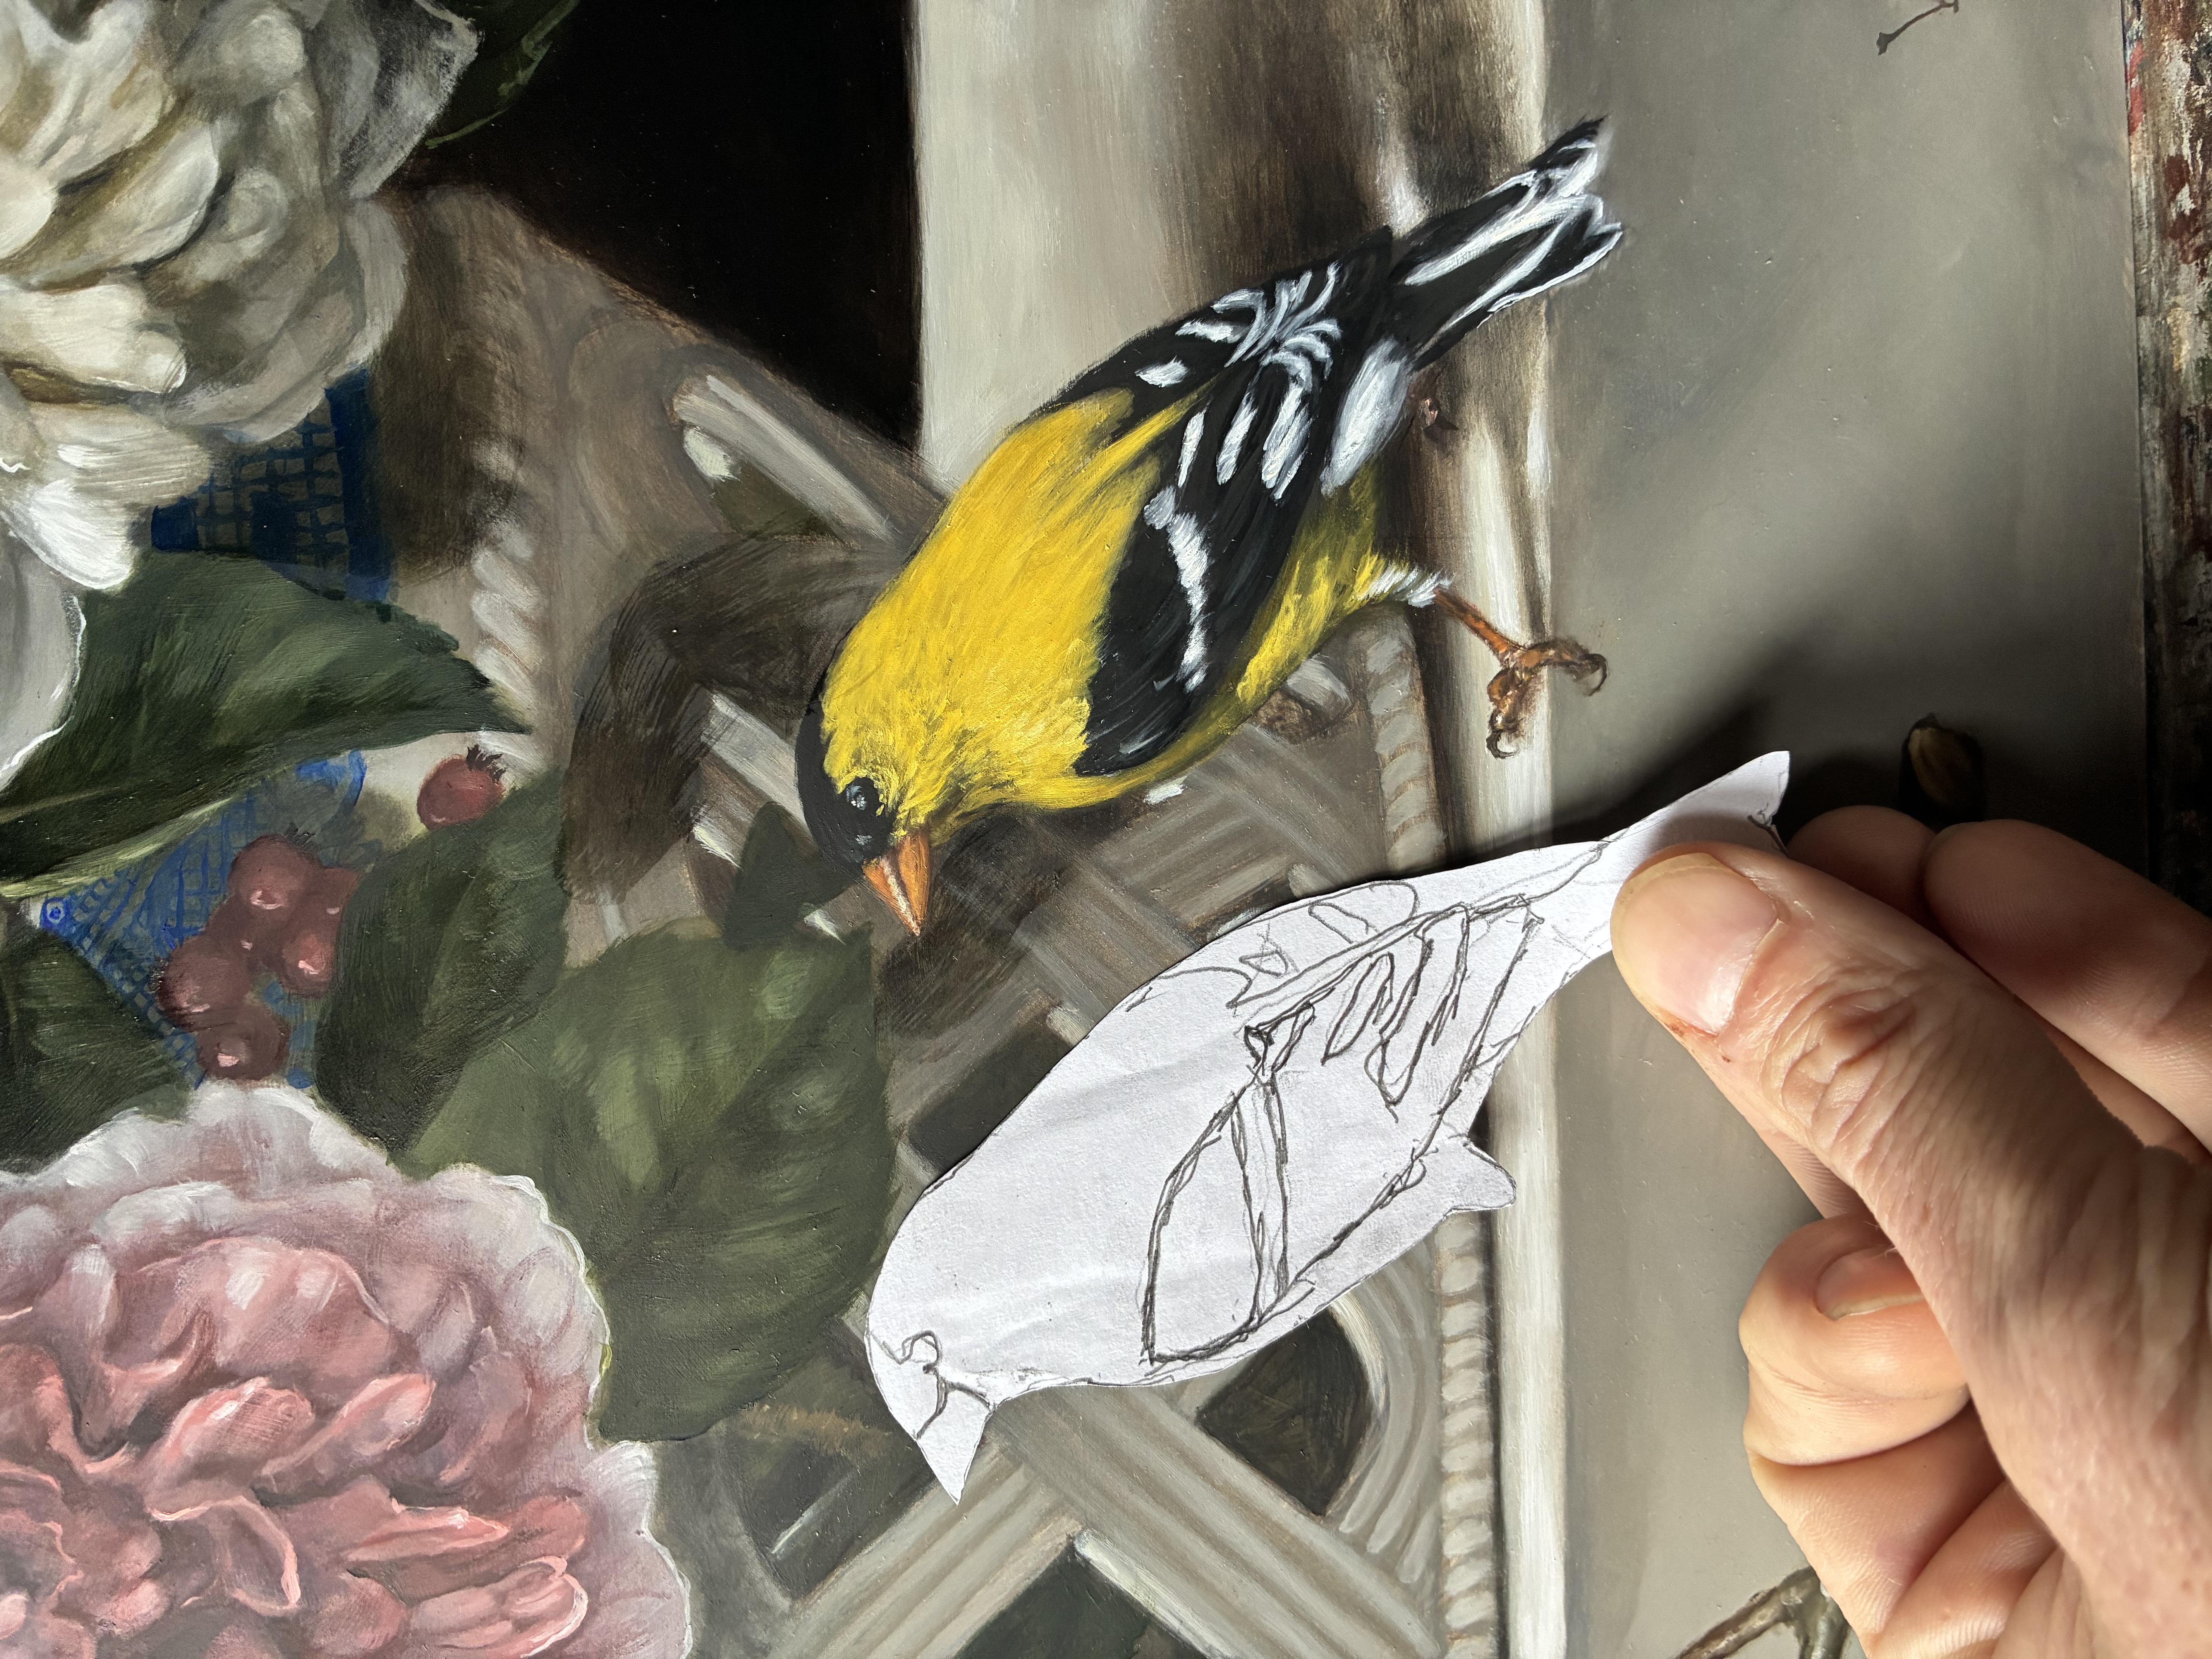
One other great "trick" that I love to use is a kind of carbon paper transfer. This was a method also used by artists during the 16th and 17th centuries. But for me, once again, I bring in the assistance of my I-Pad. Basically it is a drawn image on a piece of paper (a bird, butterfly, flower, etc.) and on the opposite side of that paper a pencil has been used to cover the area of the image with graphite, making a type of carbon paper. Then, placing this paper image over the spot on your panel where you wish it to go, graphite side down, you then, carefully, trace the main lines of the image, and so transferring image to panel. I mostly use this technique when I have completed a painting and now would like to add a bird, or butterfly, an additional detail.
The I-Pad comes into play when I need to size the image to fit the scale of my painting. So, downloading my photo to the I-Pad I am then able to enlarge or shrink the image with my fingers, getting just the right size. Then, taking a piece of paper and placing it over the image on the computer, I trace it. After using a pencil to rub all over the reverse side of the paper, it is then ready to be transferred to the panel, correct in scale.
It has been found that the 16th century floral painter, Ambrosius Bosschaert (my favorite, by the way), has used the same flower in numerous paintings. The technique of the time was for the artist to produce, throughout their travels, detailed drawings of various flowers. Then bring them back to their workshop and, when needed, use them to transfer the detailed drawing onto their panel. This was not always the case, but it was used enough where researchers today can recognize these transfers of similar flower heads used in other paintings, and x-radiography can detect the drawing underneath the paint surface. And, as much time would have gone into these drawings, it would not have been economical to use a successful drawing only once.
Another well known Dutch artist who used this method was Gerard ter Borch, famous for his elegantly dressed women in satin dresses. Just like Bosschaert and his often used flower sketches, you can find the exact same dress folds, pleats, wrinkles and all in many of ter Borches paintings. It is assumed that he made detailed sketches of textiles draped over a manikin, capturing the nature of heavy satin where it is pleated, or creased, or how it looks and acts as it hits the floor. Here is an excerpt from the 2004 ter Borch exhibit catalog at the National Gallery in Washington: "... the drawings must have been transferred to the gray ground of the canvas by a mechanical procedure. Such a transfer would have been fairly simple. The drawing was probably laid on the canvas with a specially prepared transfer paper inserted, pigment side down, between the two. With a pointed, but not overly sharp tool, the artist traced the contours of the design, thereby pressing the pigment powder from the transfer sheet onto the canvas." -Arie Wallert
Tricks of the trade. Every profession finds what works for them. And I have found that it is helpful for me to have some kind of aid in the transfer of image to panel, then allowing me full freedom to get into the painting process, free from any other help.
With the show season over, I now look forward to hibernation in the studio, concentrating fully on paintings for 2026. I realized many years ago that I never have enough paintings, which is a good problem to have! And so, these large blocks of painting time are a must, and I squander them not. Be sure to keep an eye on my website www.jameswhitbeck.com to view the latest work as well as to see the 2026 show schedule as it forms. I will be adding new shows this year and hopefully I will be accepted, making a nice full, quality schedule. You never know though. My Whitbeck Notes, Spring 2025 talks all about this and the show jurying and acceptance process, so take a look if you have not already. Another new thing for me this year has been Instagram. I finally did it. Friends and patrons have for years been telling me that I need to do this! Do posts! Make reels! Its a must! So here I am! You can find me under James Whitbeck Artist. I do have to admit, it is kind of fun.
All my best,
James Whitbeck
(413) 695-3937

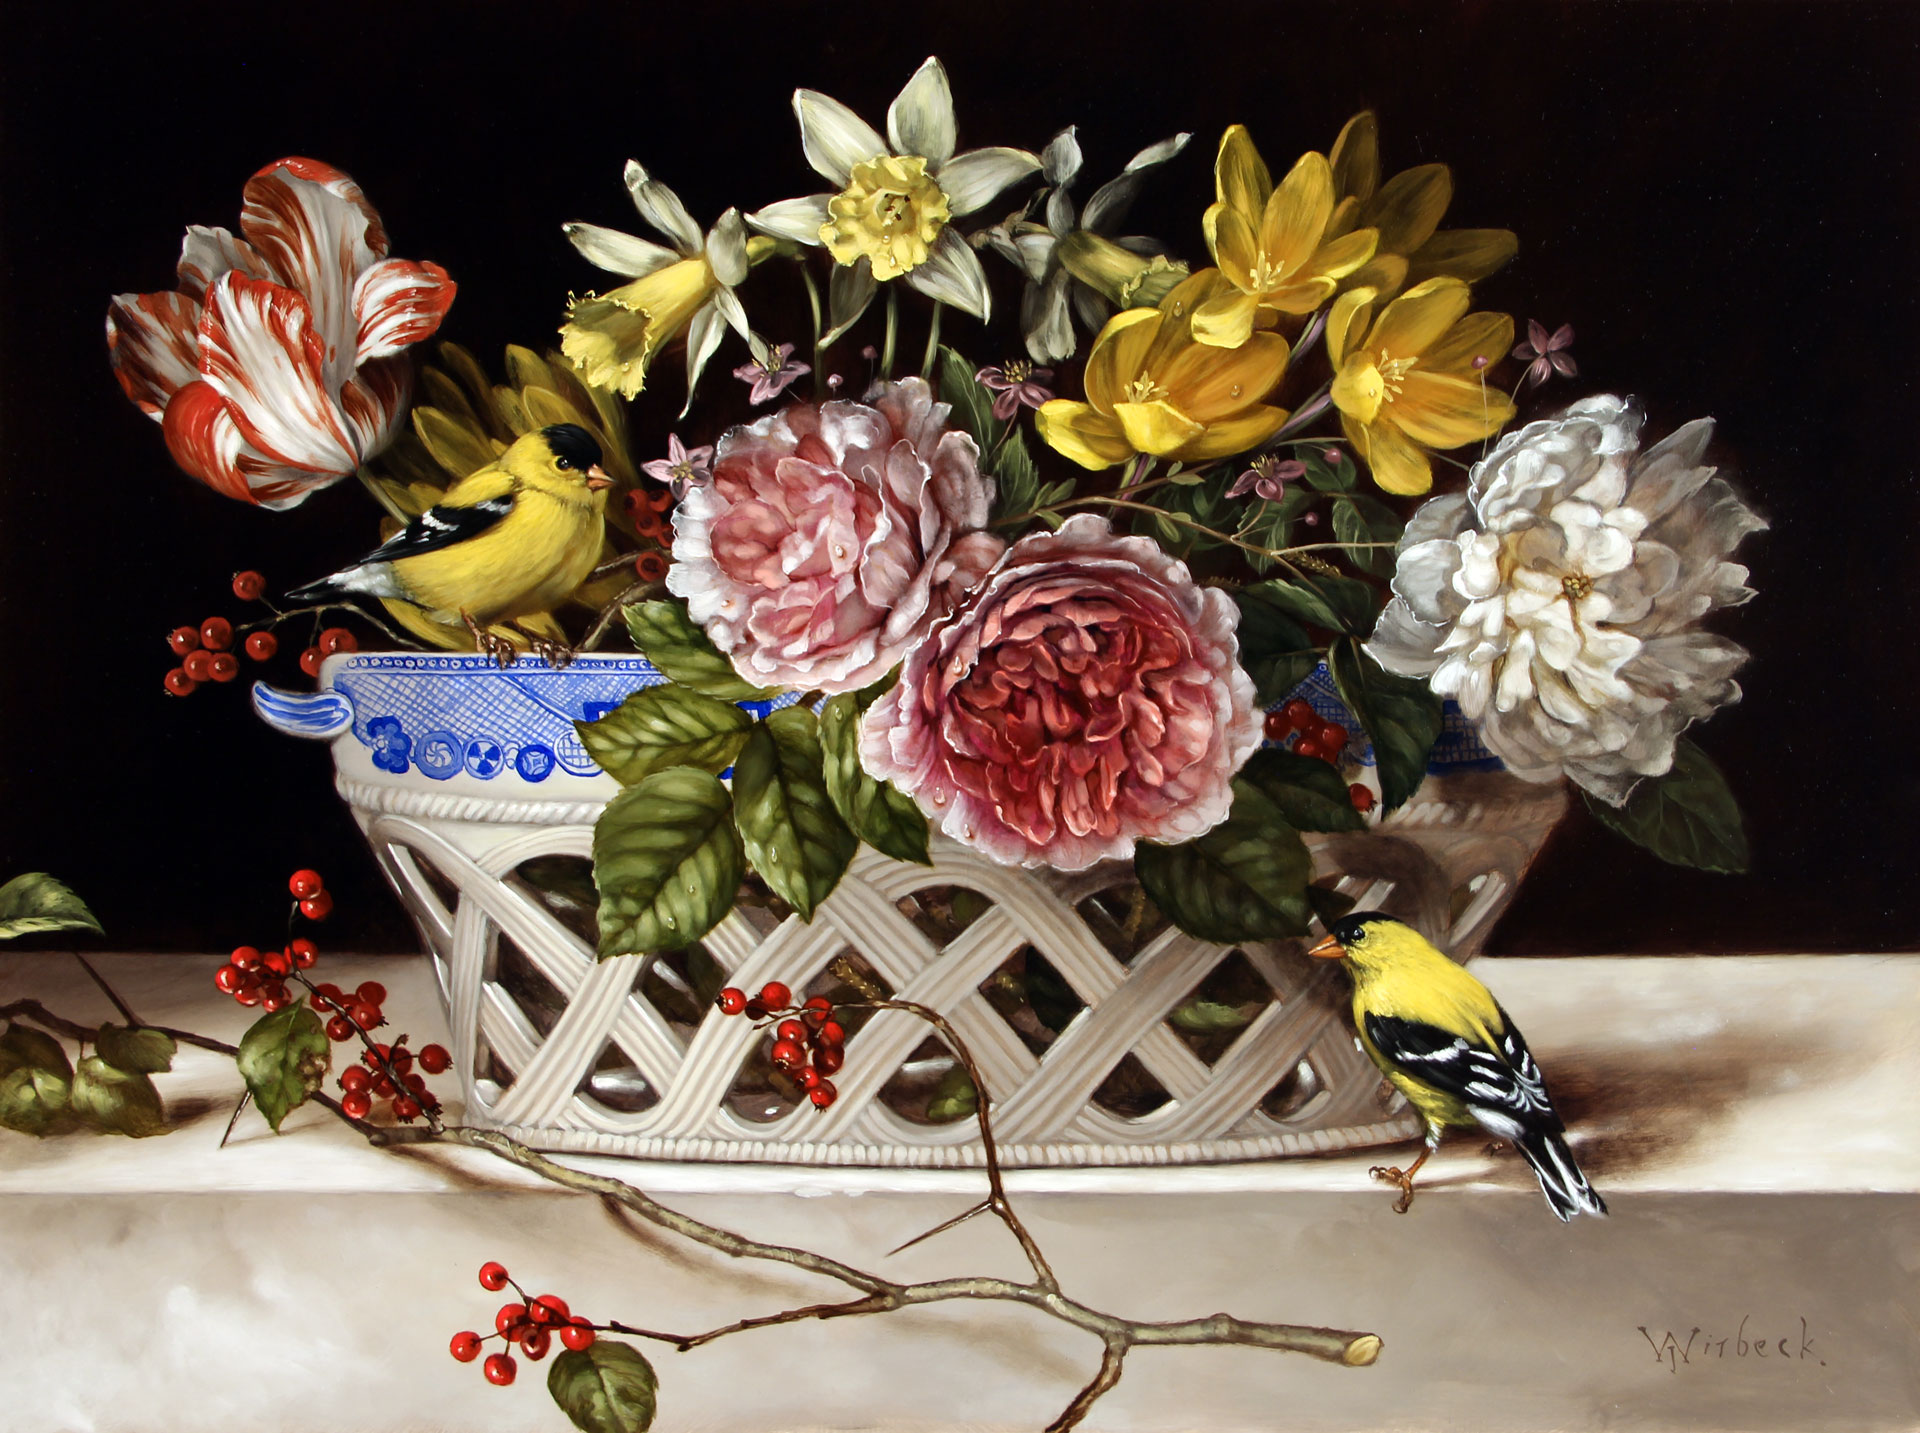
Finches Floral
18" x 23" oil on panel
NEW PAINTING

Yellow and Blue
14" x 18" oil on panel
NEW PAINTING

Niche of Flowers
20" x 16" oil on panel
NEW PAINTING

Ranunculus with Wren
20" x 16" oil on panel
The artist pictured above uses a wooden rod to keep his head steady as he transfers the image before him onto panel.
My plastic grid with tape used to mark off the borders, duplicating the number of squares corresponding to my panel. Five and a half high, by seven wide. Here we have passion fruit and figs that will be seen in a new painting coming soon.
Previously used drawings of birds and butterflies showing fronts and backs. The graphite rubbing is clearly visible.
To the right you can see the drawing used for one of the finches in "Finches Floral".